
How to clean a dirt bike exhaust pipe – In 7 Steps (2023)
As a dirt bike owner, you know that regular maintenance is key to keeping your bike running smoothly and looking its best. One important aspect of maintenance is keeping your bike’s exhaust pipe clean. It not only looks unsightly, but it can also negatively impact the performance of your bike. If you’re ready to restore the shine to your pipe, then you’re in the right place. we’ll guide you through the process of cleaning your dirt bike’s pipe, step by step. With the right tools and a little bit of elbow grease, you’ll have your exhaust pipe looking like new in no time. So, gather your materials and get ready to tackle this quick and easy cleaning task.
Steps to cleaning your dirt bike exhaust pipe:
- Place dirt bike on flat, stable surface
- Ensure exhaust is cool enough to touch
- Remove exhaust system from the bike
- Gather your materials
- Remove visible dirt or debris
- Apply the cleaning solution
- Rinse the pipe
Step 1- Place dirt bike on flat, stable surface

Positioning your dirt bike on a flat, stable surface is simple. First, make sure the surface you select is not only flat but also firm and level. If you have a hard time finding a suitable surface, you can use a piece of plywood or an old carpet to create a level surface. When you’ve found the perfect spot, place your dirt bike so that the front tire is pointed forward and the rear tire is pointed away from you.
Step 2 – Ensure exhaust is cool enough to touch.
Before you begin cleaning your dirt exhaust pipe, it’s important to make sure that the pipe is cool enough to touch. If the pipe is still hot to the touch, you’ll need to wait until it has cooled down completely before proceeding. This is for your own safety, as the pipe can get extremely hot during normal use and can cause burns if it is touched while it is still hot. It’s also important to allow the pipe to cool down to avoid damaging it. Some materials, such as aluminum, can become brittle when they are exposed to extreme heat and can be easily damaged if they are manipulated while they are still hot. By waiting until the pipe is cool to the touch, you’ll be able to clean it safely and effectively without causing any damage.
Step 3 – Remove exhaust system from the bike
Removing the exhaust system from your bike may seem like a daunting task, but with the right tools and a bit of know-how, it’s a relatively simple process. Here’s a step-by-step guide to help you get it done:
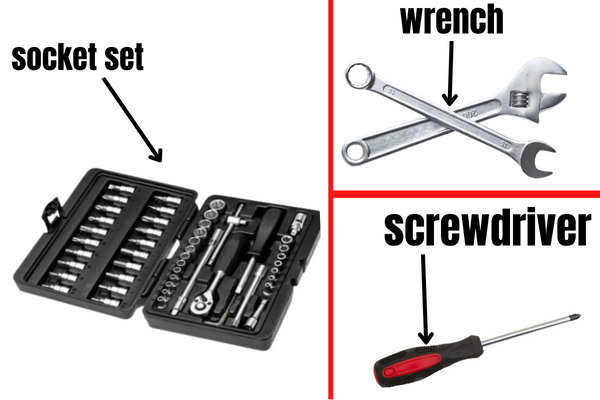
Gather your tools: To remove the exhaust system, you’ll need a few basic tools, including a socket set, a wrench, and a screwdriver. Make sure you have everything you need before you begin.
Locate the exhaust system: The exhaust system on a bike is typically located near the rear wheel, underneath the bike. It may be hidden by other components, so you may need to do some searching to find it.
Remove any fasteners: Once you’ve located the exhaust system, you’ll need to remove any fasteners that are holding it in place. This may include screws, bolts, or clips. Use the appropriate tool to loosen and remove these fasteners.
Lift off the exhaust system: With the fasteners removed, you should be able to lift the exhaust system off the bike. Be careful not to damage the system or any surrounding components as you remove it.
Set the exhaust system aside: set it aside in a safe place where it won’t get damaged. You may need to refer to it later when reattaching the system, so keep it close at hand.
By following these steps, you should be able to safely remove the exhaust system from your bike. Just be sure to take your time and use the right tools to avoid any accidents or damage.
Step 4 – Gather your materials
Cleaning a dirt bike’s exhaust pipe is a crucial part of maintaining your bike’s performance. Over time, dirt, grime, and other debris can build up inside the exhaust pipe, reducing its efficiency and potentially causing issues with the bike’s overall performance. over the steps, you can take to properly clean your can including gathering the necessary materials and tools.
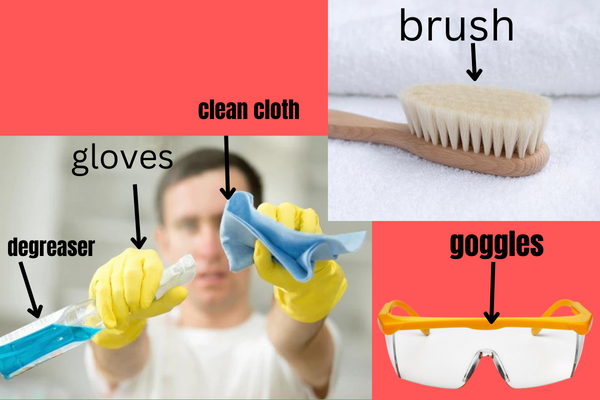
To begin, you’ll need to gather your materials. You’ll need a few basic items, including gloves, goggles, a degreaser, a soft-bristled brush, and a clean cloth. You may also want to have a towel or drop cloth on hand to protect the surrounding area from any messes that may occur during the cleaning process.
Once you have your materials gathered, you’re ready to begin cleaning your dirt bike’s exhaust pipe. Start by putting on your gloves and goggles to protect yourself from any dirt or debris that may fly out of the pipe during the cleaning process. Then, using your degreaser, liberally spray the inside of the exhaust pipe. Allow the degreaser to sit for a few minutes to loosen up any dirt or grime that may be stuck to the walls of the pipe.
After the degreaser has had a chance to work, use your soft-bristled brush to scrub the inside of the exhaust pipe. Be sure to pay extra attention to any areas that are particularly dirty or stubborn. Once you’ve scrubbed the entire length of the pipe, use a cloth to wipe away any remaining dirt.
Finally, give the inside of the exhaust pipe a thorough rinsing with water to remove any remaining degreaser or dirt. Once the pipe is clean and dry, you can reattach it to your dirt bike and get back to riding.
Step 5 – Remove visible dirt or debris
Cleaning a dirt bike exhaust pipe is an important maintenance task that can help to keep your running smoothly. Before you begin cleaning the pipe, it’s important to first remove any visible dirt or debris that may be present. This will help to make the cleaning process easier and more effective.
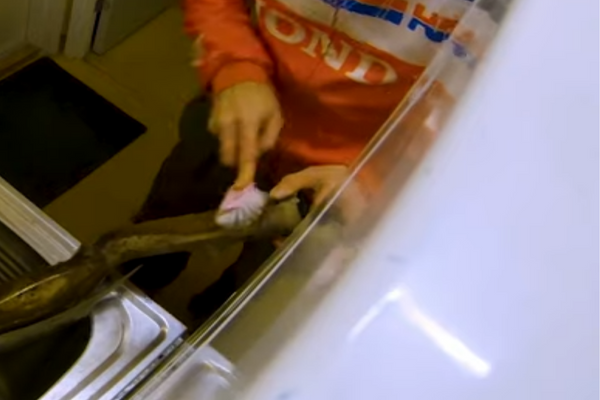
To remove visible dirt and debris, you can use a variety of methods. A simple method is to use a rag or towel to wipe down the surface of the exhaust pipe, paying particular attention to any areas that tend to accumulate dirt and grime. If you have a high-pressure hose, you can also use it to blast away any caked-on dirt or debris. Just be sure to use caution and hold the hose at a safe distance to avoid damaging the exhaust pipe.
Another option is to use a bike-specific cleaner or degreaser. These products are designed to break down dirt and grime and make it easier to wipe away. Simply apply the cleaner or degreaser to the affected areas, let it sit for a few minutes to work its magic, and then wipe it off with a rag or towel.
Regardless of which method you choose, be sure to take your time and pay attention to all the nooks and crannies on your dirt exhaust pipe. A little bit of elbow grease can go a long way in keeping your bike clean and in good working order.
Once you’ve removed all of the visible dirt and debris from your dirt bike’s exhaust pipe, you can proceed with the actual cleaning process. This may involve using a commercial exhaust pipe cleaner or a homemade mixture of water and baking soda, as well as a small brush to scrub away any remaining dirt and grime. Once you’ve finished cleaning the, be sure to dry it off with a rag or shop towel to remove any leftover cleaner or moisture.
Step 6 – Apply the cleaning solution
Use your hose or bucket of water to rinse off the cleaning solution and any dirt or debris that has been scrubbed off the pipe. Be sure to remove all of the cleaning solutions to prevent any residue from being left behind.
Step 7- Rinse the pipe
Whether you’re an enthusiast or a beginner, it’s important to take proper care of your bike. One important step in your regular maintenance routine should be to scrub the exhaust pipe. This helps to prevent clogging and rusting and can help keep your bike running smoothly. Start by removing any debris or dirt that has built up around your exhaust pipe.
You can do this with a soft brush or cloth. After you’ve removed any loose material, you can then use a degreaser or a mixture of baking soda and water to clean the pipe. Make sure to rinse the pipe thoroughly with water after you’ve finished cleaning. Then use a wire brush to scrub away any rust or corrosion that may have built up over time.

Be sure to rinse the pipe with water after you’ve finished scrubbing. Finally, use a metal polish or oil to protect the exterior of the pipe. This will help to preserve its shine and keep it looking great. By taking a few minutes to scrub your dirt bike’s exhaust pipe, you’ll be on your way to keeping it in top condition. Not only will this help your bike perform better, but it will also help to extend its lifespan.
Frequently Asked Questions (FAQ)
Q1. What can I use to clean my exhaust pipe?
Answer: The best way to clean your exhaust pipe is to use a degreaser, such as Simple Green or WD-40, which can help break down grease and grime. You can also use baking soda and water, or even a power washer. Be sure to wear protective gear, including gloves and goggles, when cleaning it.
Q2. How do you clean a rusty dirt bike exhaust?
Answer:
1. Start by scrubbing the exhaust with a wire brush or steel wool to remove any visible rust.
2. Prepare a mixture of equal parts of water and white vinegar.
3. Submerge a clean rag into the mixture and use it to scrub the rusted surface.
4. Allow the mixture to sit on the exhaust for a few minutes to allow it to penetrate and loosen the rust.
5. Rinse the with clean water.
6. Use a rust converter to neutralize the rust and turn it into a protective coating.
7. Let the rust converter dry completely before applying a wax or polish.
8. Finally, finish by applying a coat of high-temperature paint.
3. How do you get moisture out of a dirt bike exhaust?
If you’re noticing moisture coming out of your exhaust, it could be a sign of a bigger issue. Moisture in a dirt bike exhaust can be caused by a variety of issues, such as worn or broken seals, a cracked exhaust pipe, and a clogged air filter. To get the moisture out of a dirt bike exhaust, you’ll need to first identify the root cause of the issue. The first step to resolving the issue is to inspect the exhaust system for any cracks, breaks, and leaks. You may also need to take the exhaust system apart to inspect the seals and gaskets.
If any of these components are worn or broken, you’ll need to replace them. Additionally, you should check the air filter to make sure it is not clogged, as this can also cause moisture in the exhaust system. Once you’ve identified and fixed the root cause of the issue, you should start the bike and let it idle for a few minutes. This will help to evaporate any remaining moisture in the exhaust system. After that, you should be able to enjoy your dirt bike without any more worry about moisture in the exhaust.
Conclusion
cleaning a dirt bike exhaust pipe can be a quick and easy task if you have the right tools and follow the proper steps. Start by protecting yourself with gloves and eye protection, and gather all the necessary materials, including a degreaser, a wire brush, and a clean cloth. Begin by removing any visible dirt and debris from the surface of the pipe. Next, apply a degreaser and scrub the inside and outside of the pipe with a wire brush. Finally, wipe down the pipe with a clean cloth and let it dry completely before reattaching it to your dirt bike. With regular cleaning and maintenance, you can keep your pipe in top condition and ensure optimal performance.